PRLS Equipment Rental Services
Package Deals:
- Basic
- Basic Plus
- Premium
- a la Carte
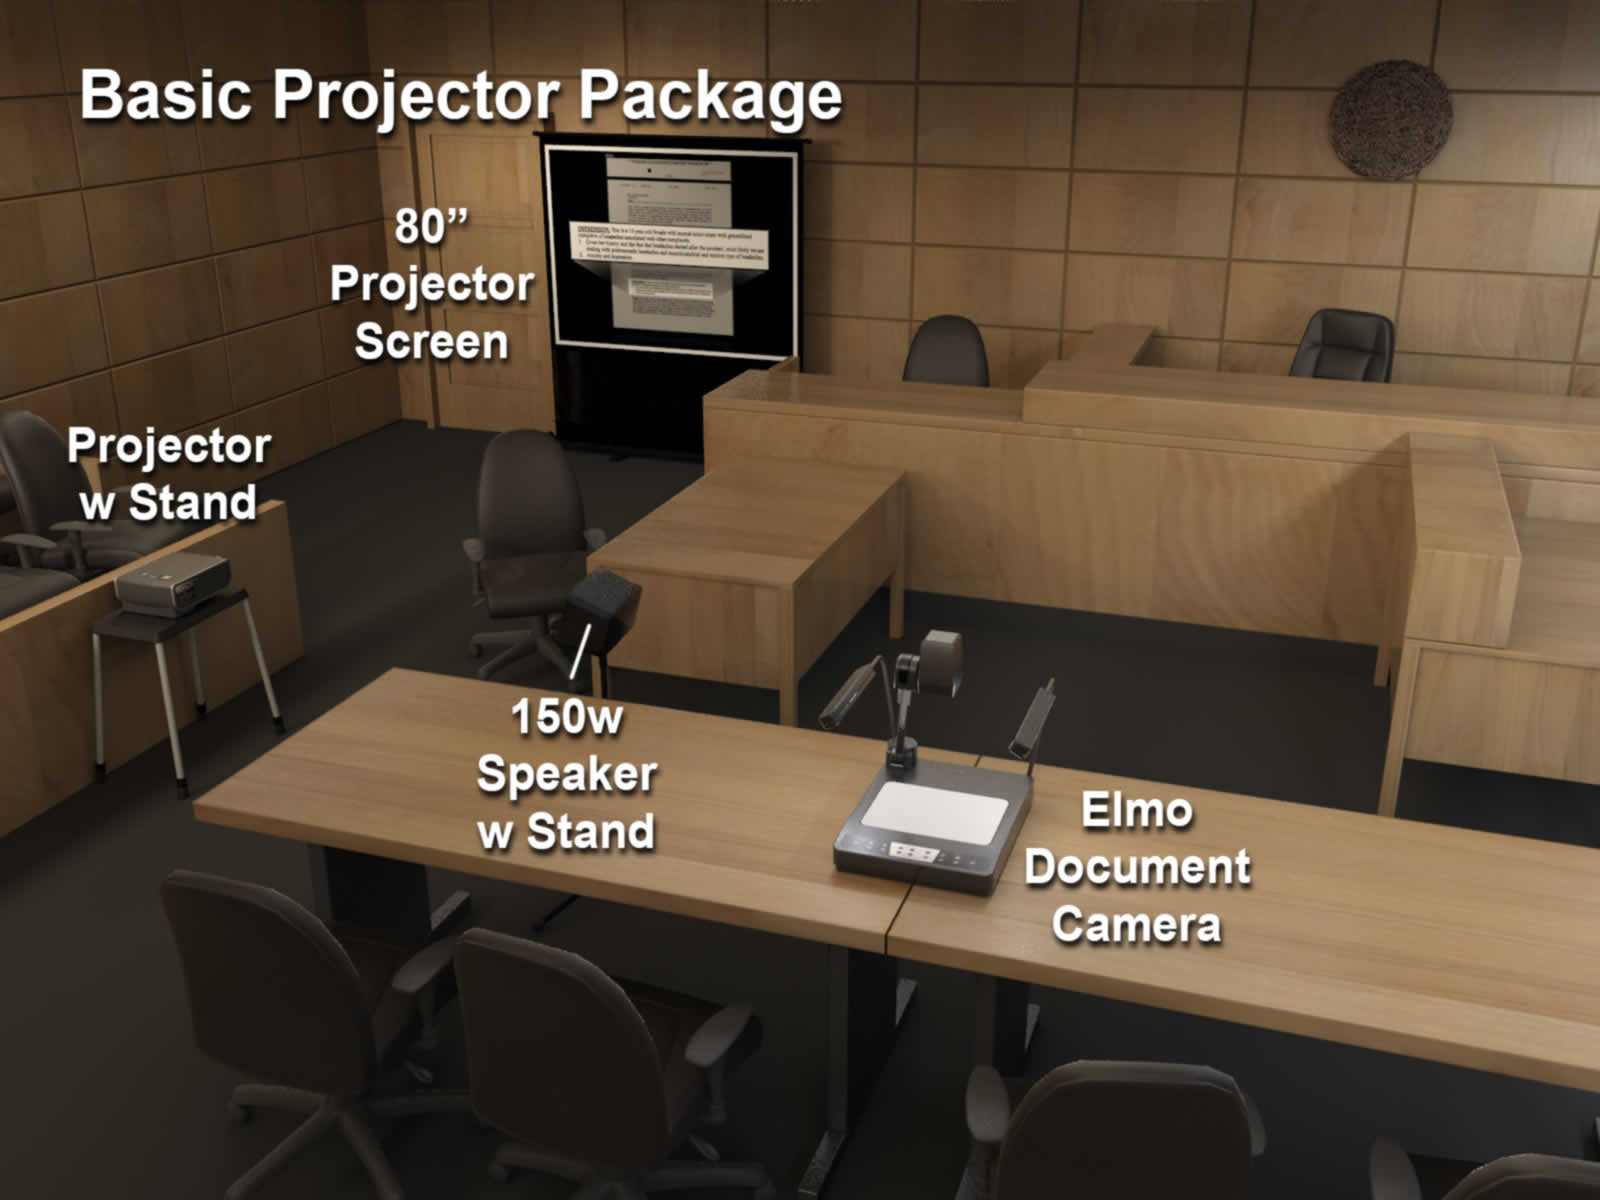
Basic Projector Package
Includes projector, screen, ELMO document camera, anchor speaker, appropriate cabling. ELMO is used as switcher to switch between laptop(s) and ELMO.
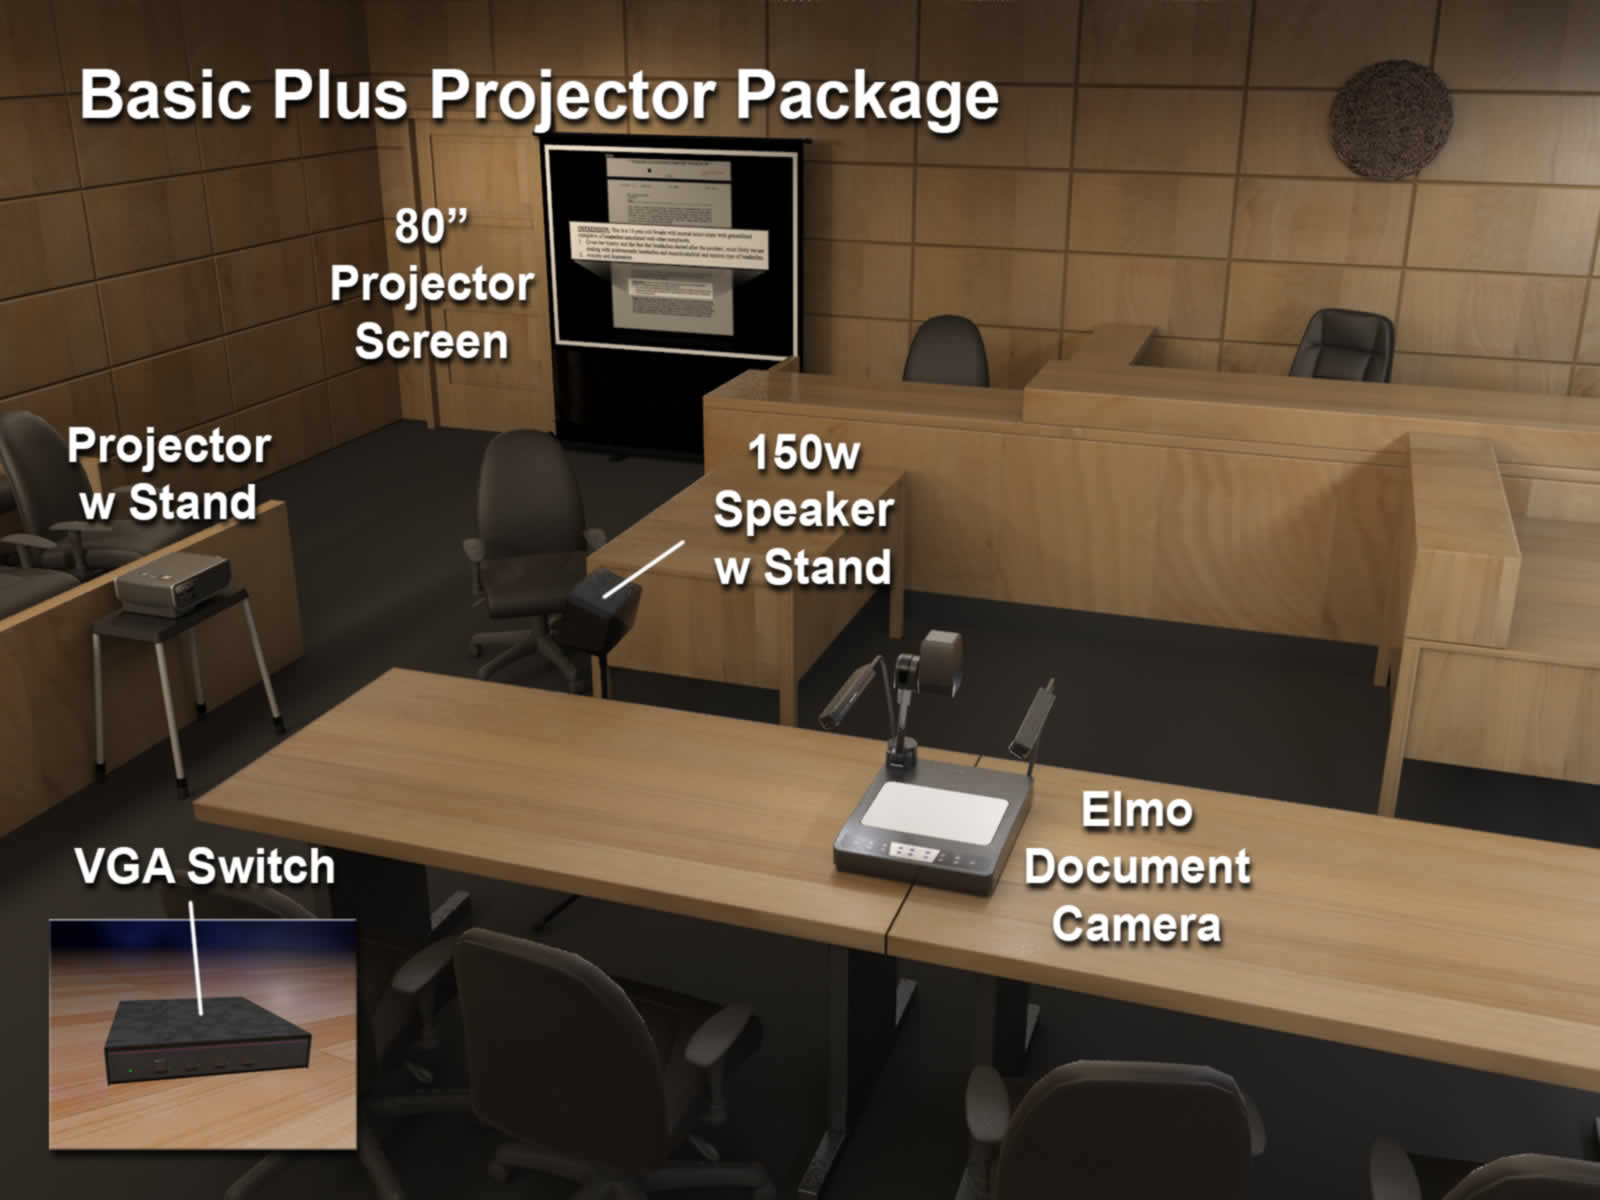
Basic Plus Projector Package
Includes projector, screen, ELMO document camera, anchor speaker, 6:1 VGA switch, 1:2 VGA splitter, appropriate cabling. VGA switcher to switch between two or more laptops and ELMO.
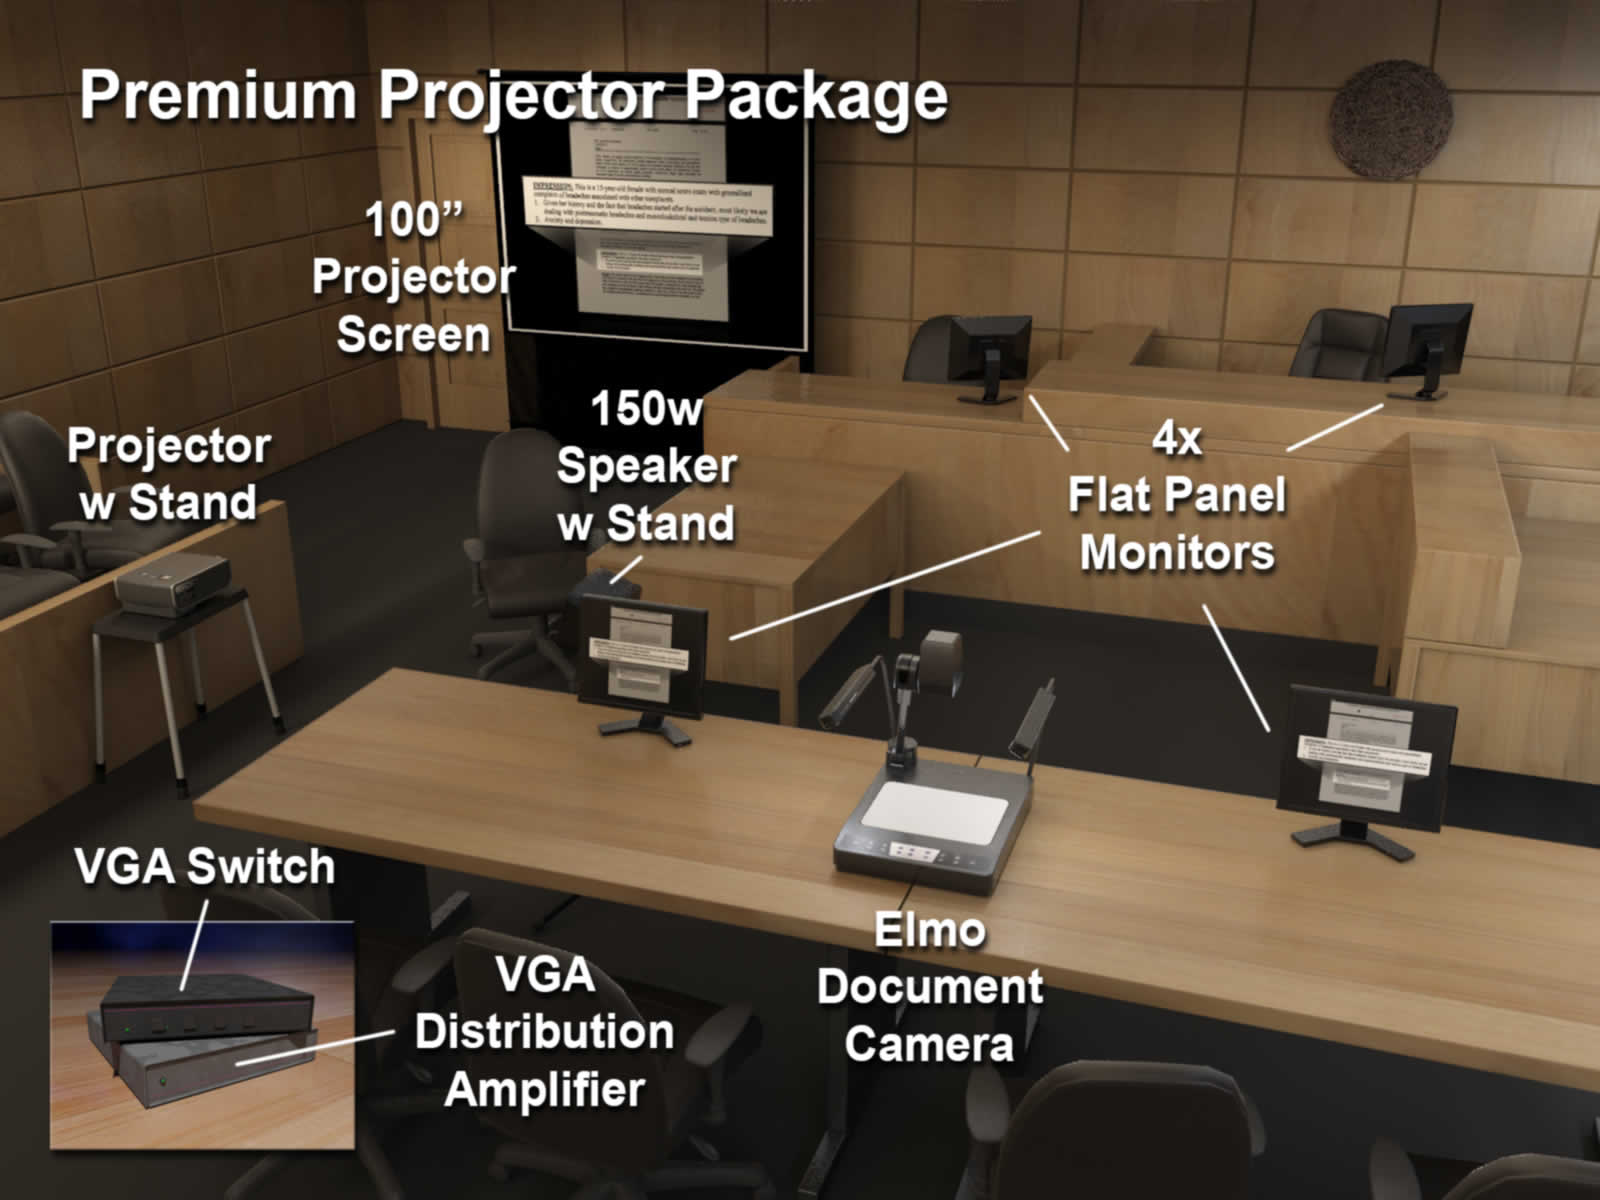
Premium Projector Package (Best Value)
Includes projector, screen, ELMO document camera, anchor speaker, 4x 15" flat screen monitors, 6:1 switcher, 1:8 VGA distribution amplifier, 1:2 VGA splitter, appropriate cabling. VGA Switcher is used to switch between two or more laptops and ELMO and distribute display signal to all monitors and projector.
a la Carte:
- Projector w/Stand
- Screen
- Elmo Document Camera w/Stand
- Flat Panel Monitors
- VGA Switch
- VGA Distribution Amplifier
- VGA Matrix Switch
- LaserJet Printer
- Rolling Book Carts, High Quality (for Trial Binders)
If you have questions or want to schedule a rental, please complete our contact form.
 Thoughts on Renting Equipment for the Courtroom:
by Peder Rudling
Why Not Just Bring Our Own Equipment?
Maybe your office already has a decent projector?
But what if the projector is DLP (shows ugly yellow color), or is too dim for the courtroom, or if it shows a loud blue screen every time you switch the input, or doesn't have enough resolution? What if you are unable to get the darn thing to work when you get to the courtroom? What if the other side refuses to use your equipment, and insists that you share the expense of using their rental vendor?
Maybe someone is willing to lend you a screen for free?
But what if the screen you brought is not the right size and you need something larger or smaller? What if your tripod stand will not fit where the court staff says you have to put the screen?
If your firm has a proven court setup that you know and trust and in-house IT staff to handle the install, great. But even so, is the risk of annoying Judge and Jury worth saving a few bucks?
When and Why Renting from PRLS Makes Sense
If you have a huge trial, involving many lawyers, war rooms, large support staff, and unlimited budget, then it is best to retain one of the larger vendors, because they can offer nationwide support and can provide vast resources on short notice.
If, on the other hand, you have 5 or 15 day trial at one of the local courthouses in Los Angeles, and are working on a budget, why not use a smaller company that provides the same (or better) equipment, more personalized service, and at a lower cost?
Scouting the Courtroom
Before you schedule an equipment install, it is generally a good idea to have someone on your team personally visit the courtroom. This is a good opportunity to befriend the court staff, and learn their preference when it comes to deciding what equipment to bring and where it should go. Be courteous with their time – show them that you are not one of the problem people they often have to deal with – ask a few key questions, take a look at the courtroom, and get out. Let the other side be the ones who draw the ire of the court staff. Remember, you are a guest in "their" courtroom, so need to conduct yourself accordingly.
If you plan on bringing flat panel monitors, you may want to ask the clerk whether the judge likes to have his own monitor, and if so, where on his desk he prefers it. (Most judges do not want anything to block their line of sight with the jury.)
If the court reporter is present, you may want to ask her where she prefers the projector. Try to assure her that you plan to bring a reasonably quiet projector and want to position it so she doesn't get hot air blown in her face. She also needs to be able to see the witness, so avoid placing the flat panel in her line of sight.
Be sure to ask the court staff where the electrical outlets are, and which ones you are allowed to use. Ask permission to enter the well and take a look at the outlets. Make a mental note on how many extension cords and power strips you will need. Mention that you plan to tape down all cables, so no one has to worry about slip-and-fall Jurors.
As you leave the courtroom, thank the staff for their time.
Before leaving the courthouse, take a moment to draw a crude sketch of the layout, while the information is fresh in your mind. When back at the office, create a cleaner sketch and email to the clients so they have a sense for what to expect.
Interacting with Opposing Counsel
Sometimes the attorneys for both sides are civil, even pleasant, with each other. More often than not, however, they tend to be on high alert for any underhanded action by the other side. There may be quite a history between both sides, and you need to do your best to stay out of it. Without necessarily giving "aid and comfort to the enemy," you should try to convey that you are there to make sure the equipment works well for BOTH sides; that your role is to make the trial more efficient. This doesn't always work, but most of the time the other side will become less hostile, less assertive, once they realize you are not a biased party.
Interacting with Opposing Counsel's Tech
The court tech community is fairly small, and you meet the same familiar faces again and again. It would be unwise to make enemies with anyone, because today's foe may well be the one who recommends hiring you for their next trial. Let the opposing tech know that you are not the enemy, but that you are there to make sure his signal works too. Most seasoned techs will quickly understand.
Sharing the Rental Expense
The projector, screen, flat panels, and switcher boxes are being used by both sides, and so it is in both sides' interest that everything operates smoothly. It is therefore very common for both sides to come to some type of agreement for sharing the cost of renting the equipment. While there are always exceptions, this tends to hold true even in cases where both sides despise each other.
Before the Equipment Install
By now you should have already done a test install at your office to make sure no component or cable is missing or damaged. I pack all needed cables with each component. This way, as long as I have the components I need, I also have all the cables and switches I need for the same.
On The Day of the Equipment Install
Whenever the install takes place, get there early. Lawyers and their staff have enough to worry about and should not have to spend one minute worrying about your whereabouts.
If possible, it may be a good idea to begin assembling the larger pieces outside the courtroom, so as to finish the installation that much quicker. Once the clerk unlocks the door, usually 8:30 am on the dot, you should be ready to pounce. Having an extra pair of hands is a good idea; helps speed up the process.
Position the larger components first, then the smaller, then connect the cables.
Be sure to test the setup before you tape down the cables: Adjust the position and focus on the projector. Make sure the Elmo signal shows up on the projector and on all the flat panels. Plug in a laptop and test both plaintiffs' and defense's vga feeds. Play a sample depo video clip to test the anchor speaker audio levels.
When you have confirmed that all equipment functions as intended, go ahead and tape down the cables. Try to position the cables where there is minimal foot traffic, and away from rolling chairs. I use black tape to hold the cables in place, but then I also use bright yellow tape where people have reason to walk, for added safety. I also put small pieces of tape to mark where the projector and screen belong, so that they can easily be repositioned in case we have to move the equipment for any reason.
Lastly, I try to leave behind a box with spare vga cables, power strips, extension cords, an extra roll of gaff tape, and sometimes a backup projector.
The entire installation, start to finish, should take no more than half an hour.